

8 min read
If you are currently taking advantage of the excellent HubSpot integration with Salesforce CRM, you’ll need to understand the impacts of the updated HubSpot-to-Salesforce “connector" package that was released on August 6th.
One of the primary features of this integration is the ability to synchronize data between the two systems and provide Salesforce Users with visibility into a timeline of how a Salesforce Contact or Lead has interacted with the content your Marketing team has been publishing in HubSpot - which is a critical sales enablement advantage for your sales team.
So, what is being updated?
Basically, this update streamlines the integration by eliminating the need for a custom object in Salesforce while providing a new and updated “HubSpot Intelligence” visualforce iframe component that is now engineered for user-specific login credentials.
In other words, the “connector” that links the two applications together will no longer store and sync data in a separate Salesforce object/data table and it will provide Salesforce Users with an improved HubSpot “Intelligence Window” connected by their unique password.
How will this benefit you?
Overall, it should provide your Salesforce Users with a better user experience while also improving the security of your overall integration and your data, including:
- An updated “HubSpot Intelligence” iframe/window that matches the design of the new Salesforce Lightning UI on Salesforce Contact and Lead page layouts
- Faster processing speeds for the integration and simplified synchronization of fields/properties
- A reduction in the number of Salesforce API calls required
- The consolidation of the “HubSpot Intelligence” and “Nurturing/Workflow” visualforce iframes into only one iframe that also allows users to both filter HubSpot “timeline” activities and enroll in workflows in one view
- Elimination of the need for a separate “HubSpot Intelligence” custom object
- Improved data security
For more information, you should refer to the official HubSpot to Salesforce Connector Update HERE and the FAQ Knowledge Article HERE. There is also a 3 step update wizard provided to you inside your HubSpot portal as described in detail below.
What Happens if I don’t Update?
If you don't update the HubSpot to SalesForce Connector, the pre-existing integration and HubSpot Intelligence iframe/window should continue to work for any Salesforce Contacts or Leads that were previously synchronized, but any NEW Contacts or Leads will not sync - and thus won't display any HubSpot data inside of Salesforce.
How Should I Implement this Update?
For most organizations, it should be a straightforward 6 Step process:
(**NOTE: You will need to have a Salesforce System Administrator Profile or request that your System Administrator to do it for you)
- Update Your Existing “Installed Package” to the latest current version (2.60.3)
- Update again to the new “Installed Package” version 3.0
- Re-connect HubSpot to Salesforce by re-entering your User credentials
- Adjust the Page Layouts for both the Salesforce Leads and Contacts
- Create HubSpot Users for all of your Salesforce Users that you want to access the HubSpot Intelligence information
- Understand the new functionality and adjust the User permissions as needed
Step 1: Updating Your Existing SalesForce Connector Package
To begin the upgrade process, login to HubSpot and proceed to the integration settings (Main Menu > Settings > Integrations > Your Installed Integrations > SalesForce > More > View Settings).
If you haven't already upgraded, you should see the "Update Available" notification window along with the first three required steps.
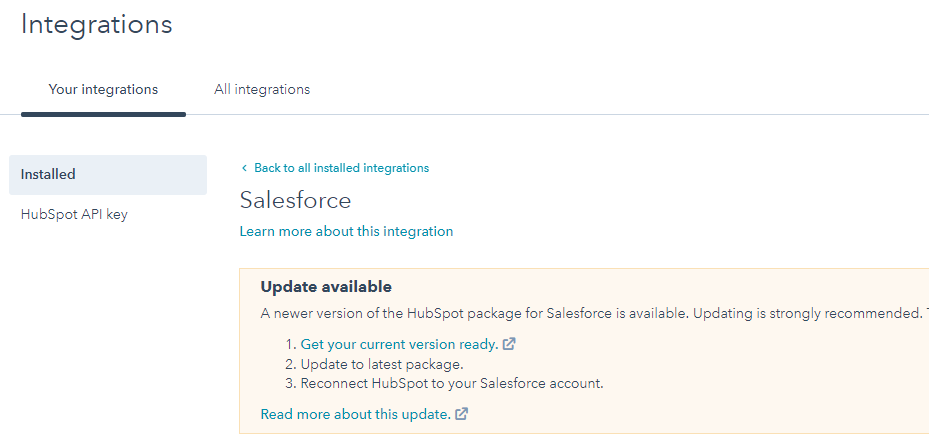
Select "1. Get your current version ready" to upgrade your currently installed HubSpot to Salesforce Connector managed package insides of Salesforce to the most recent version.
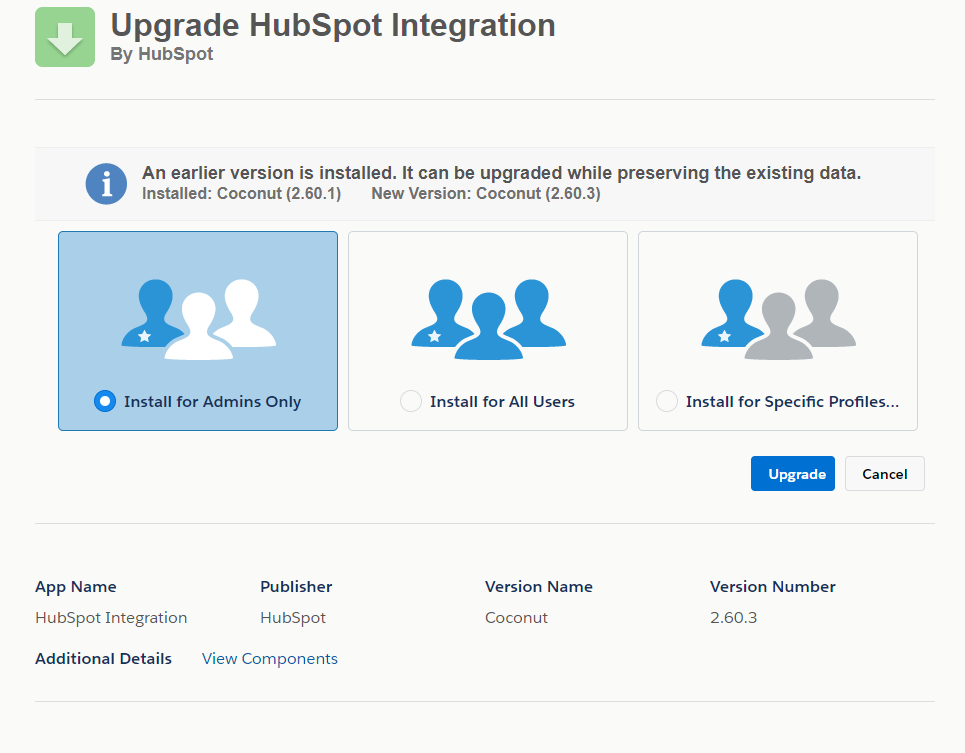
This will open a browser window for you to login to Salesforce if you are not already logged-in, and prompt you to update your current package to version 2.60.3.
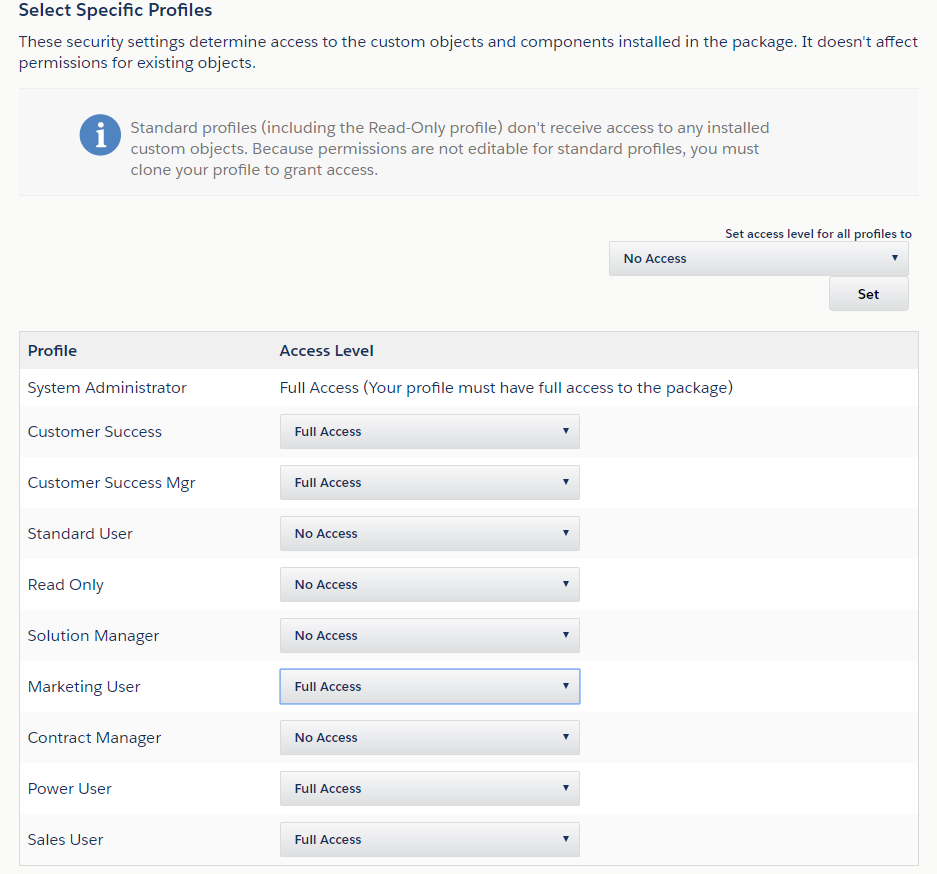
Here, you will select if you want to make the upgraded package available to just the Salesforce Administrator, All Users, or a subset of your Users based on their Profiles.
Because this first step is only a "preliminary" upgrade, you probably only need to install for the Admin and then select the "Upgrade" button because we will update the package again in step 2.
It may take a few moments for the upgrade to finish running, but once it is complete the screen will say "Done" and then direct you toward the main Salesforce Installed Packages page.
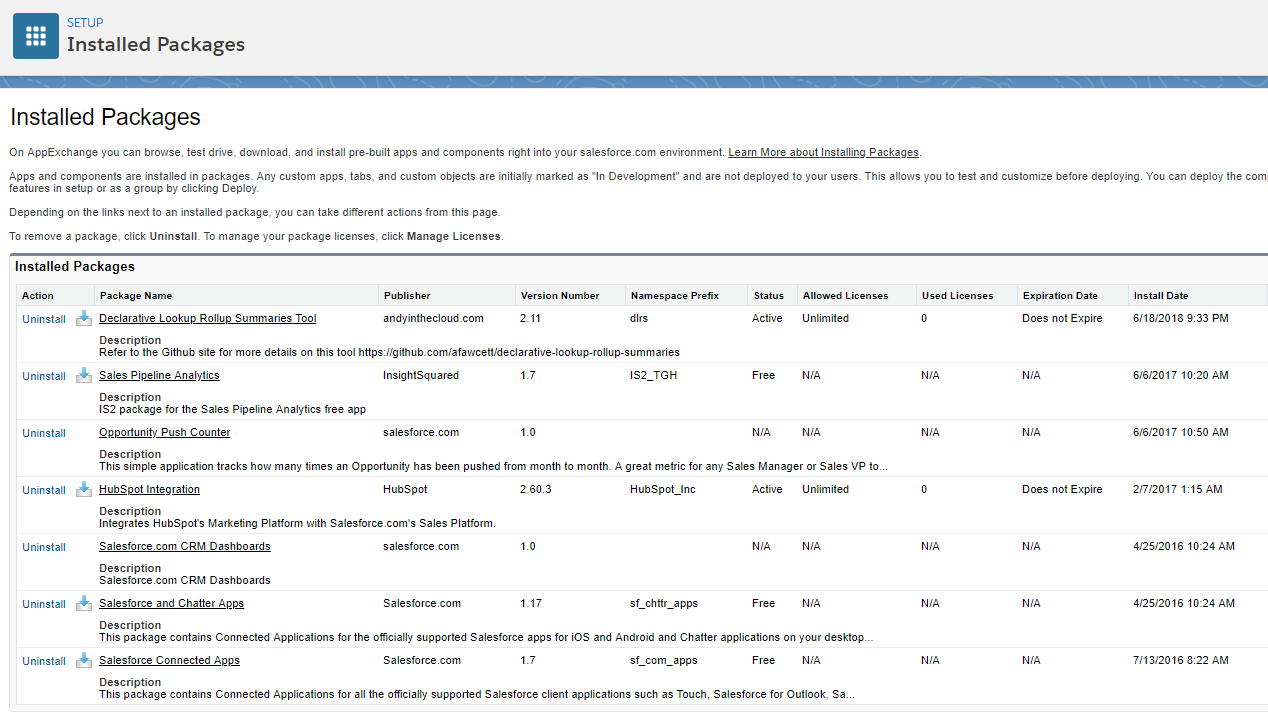
You should also receive an email notification that the upgrade was successful.

Step 2: Updating Your Existing SalesForce Connector Package (Yes, that means do it again!)
Now, return again to HubSpot and your HubSpot integrations page where we began for step #1 and select "2. Update to latest package".

Again, this should automatically open a browser window to Salesforce that will allow you to upgrade a second time - this time to package version 3.0.
However, this time, if you don't want to make the package available to ALL SALESFORCE USERS you can select "Install for Specific Profiles" and choose the profiles for Salesforce Users that you will want to have access to this integration.
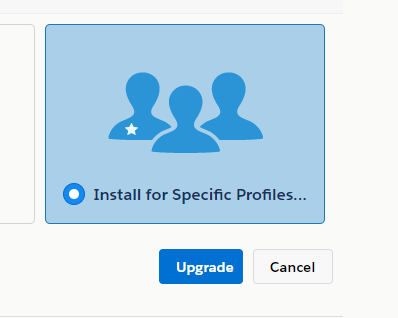
When you are satisfied with the access settings for your Salesforce Users, select the "Upgrade" button.
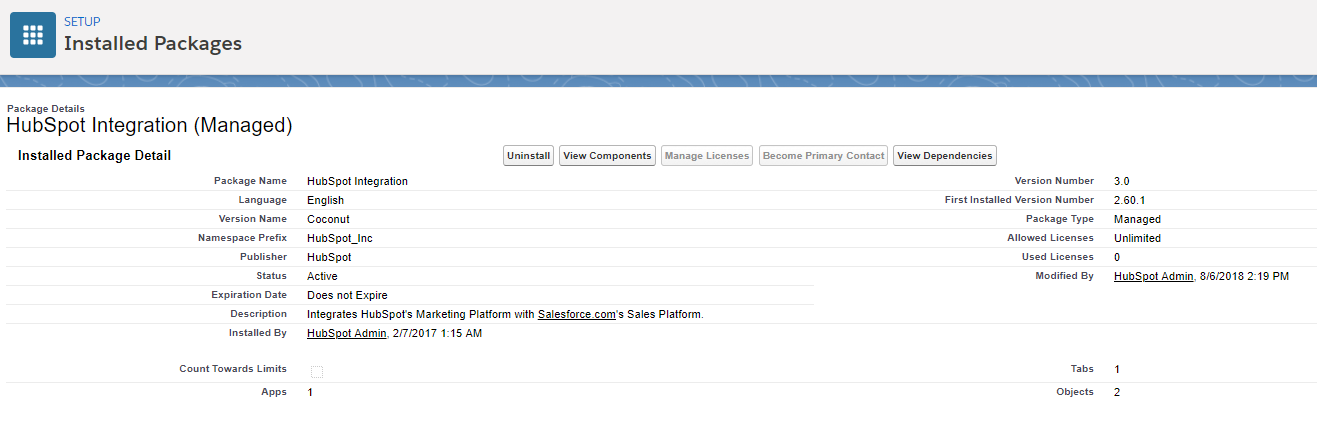
Again, it may take a few moments for the upgrade to complete and you will be notified and re-directed to Salesforce Installed Packages screen to confirm the package version number 3.0 is installed correctly.
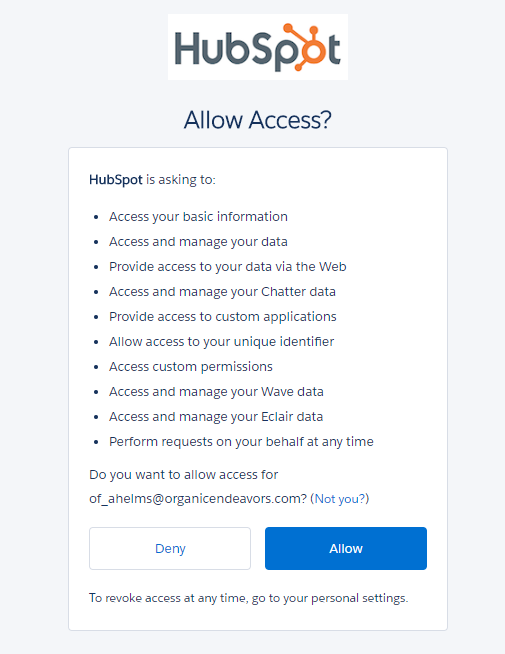
Step 3: Re-connect HubSpot with SalesForce
Again, return to HubSpot and complete the third step of re-connecting HubSpot with Salesforce by selecting "3. Reconnect HubSpot to your Salesforce account".
This should prompt you to enter your login ID and password again. Enter this and select "Allow Access" to re-connect HubSpot with Salesforce.
Now, at this point, you have completely updated your HubSpot to Salesforce Connector Managed Package which means the banner at the top of the HubSpot Integrations page should read "Package update complete"!

Step 4: Re-configure Your Salesforce Contact & Lead Page Layouts
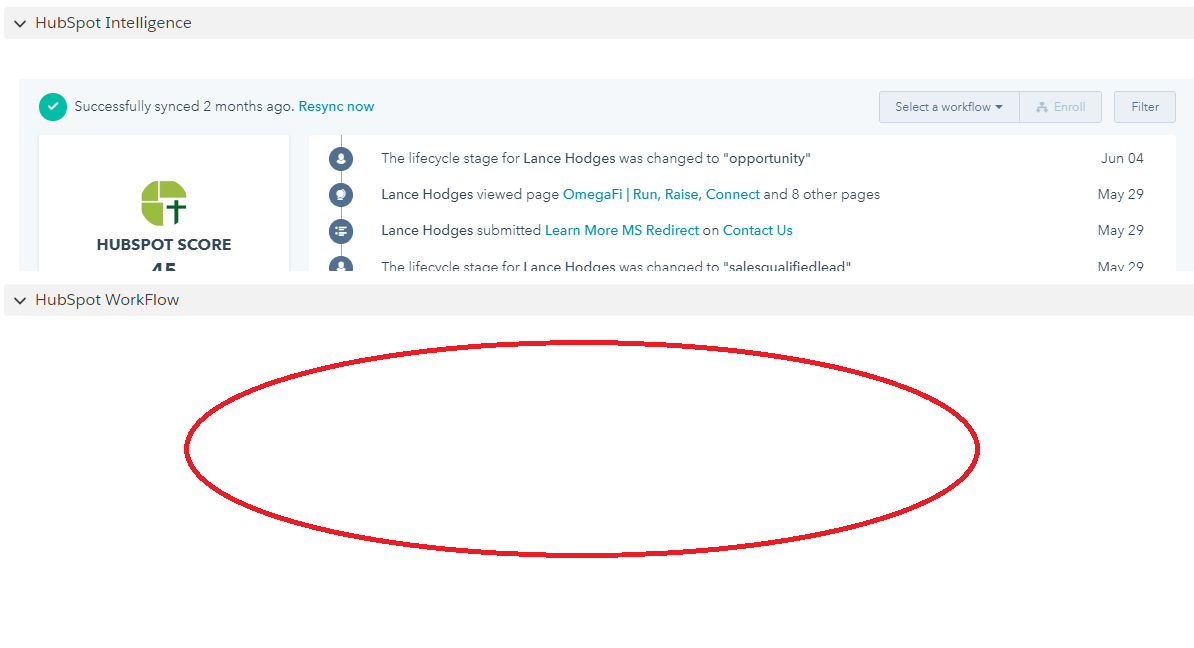
Now that your package is updated to v3.0, you should also be able to go to a Salesforce Contact or Lead record and see if the new HubSpot Intelligence iframe/window appears.
When you do this, you may notice that it no longer fits properly within the page (typically the lower portion of the HubSpot Intelligence iframe might be cut off and, if you have been using the previous version's "Nurturing/Workflow" iframe, it may be blank).
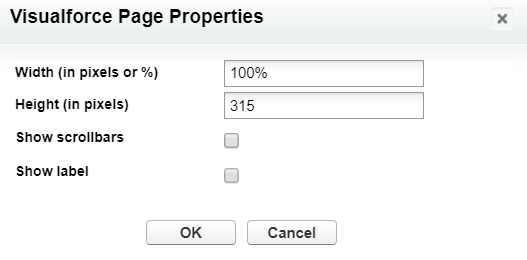
To fix this, you will need to go into your Salesforce Setup > Object Manager > Contact > Contact (or Lead) Page Layout editor and adjust the pixel height of the HubSpot Intelligence iframe to at least 315 pixels and remove the HubSpot Nurture/Workflow Enrollment iframe as it is no longer needed.
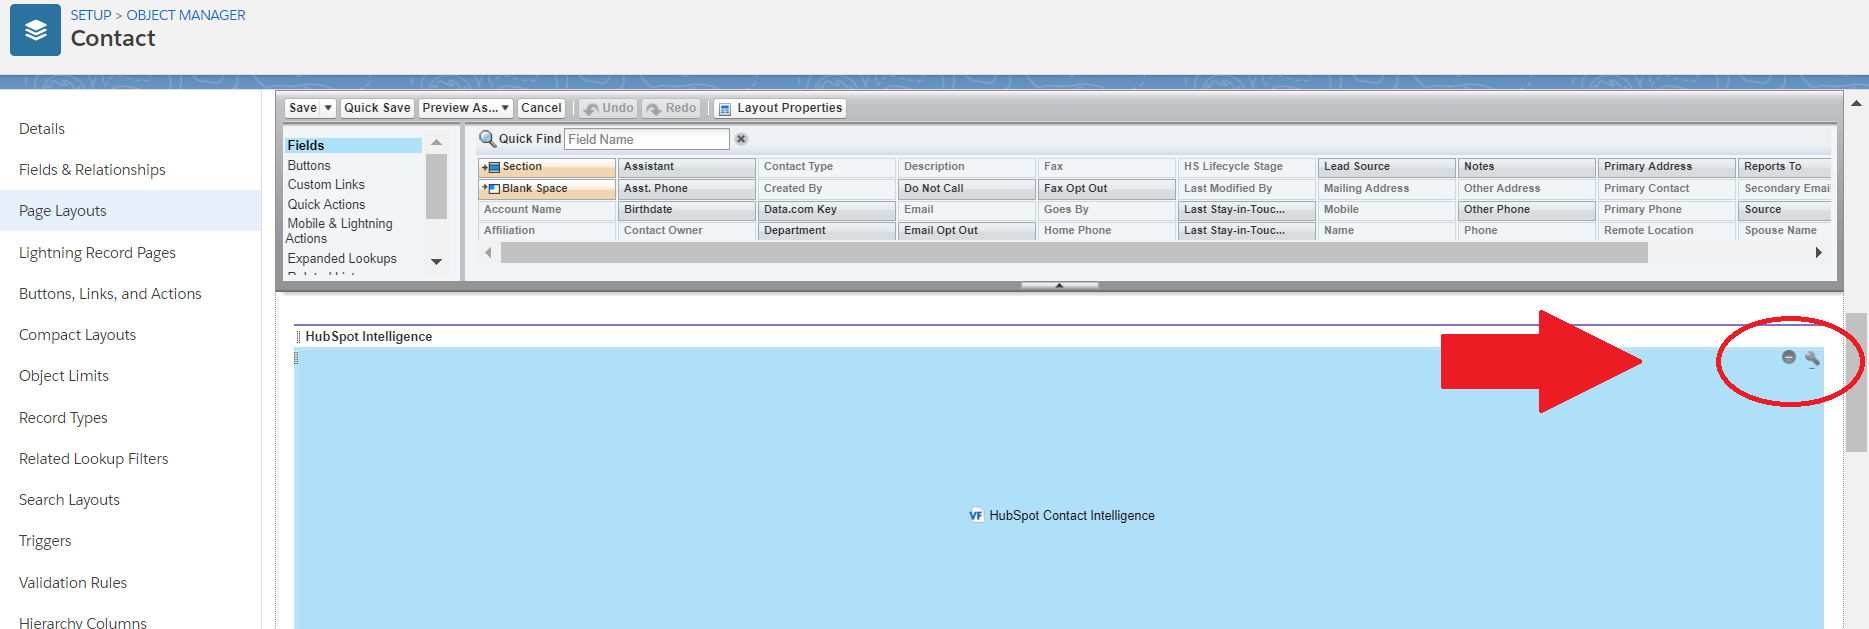
If you are using both Leads and Contacts in Salesforce, remember to reconfigure all of the page layouts for both.
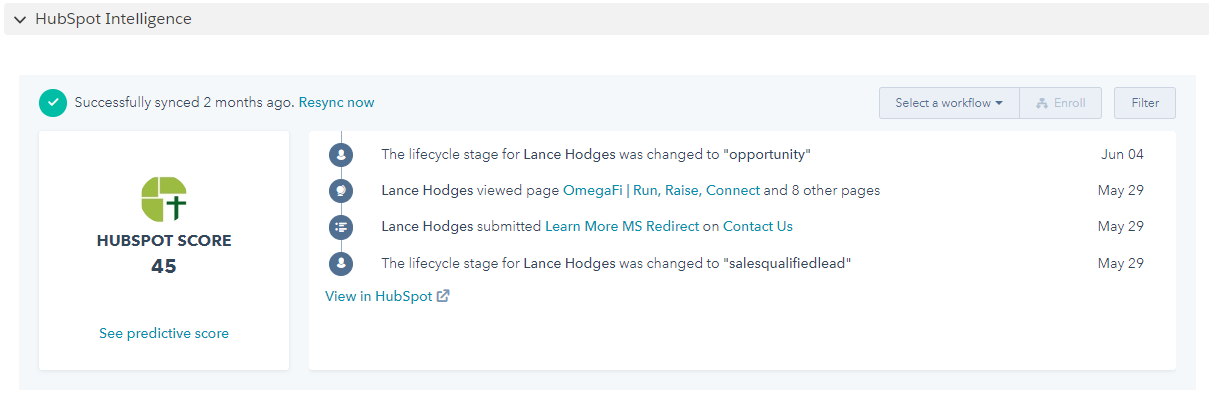
You can test it by checking a few actual Contacts or Leads to make sure you like how it looks. It should look like this:
Step 5: Confirm All Salesforce Users are also HubSpot Users
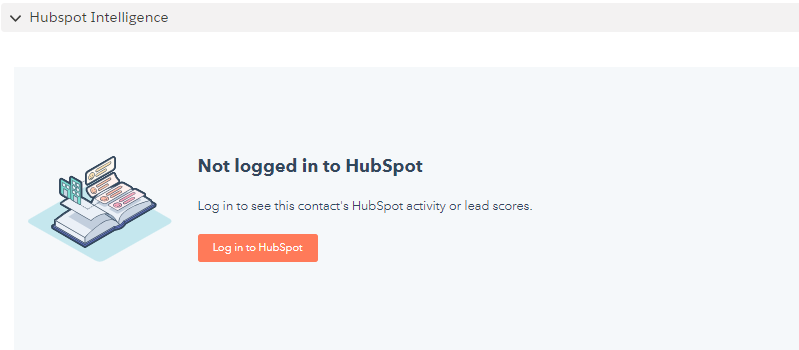
Technically, you are done updating and setting up the HubSpot to Salesforce Integration Package, but because it is now secured on a User by User basis, you will need to makes sure that every Salesforce User you want to utilize the HubSpot intelligence feature has also been set up in HubSpot as a User.
This is new for version 3.0 of the package, and it is what allows you to have more security for your data synchronization.
To do this, you can either manually set up each new User in HubSpot as you normally would, or if you have a large number of users, you can do it in bulk by referring to this HubSpot Knowledge Article.
If the Salesforce Users are not set up in HubSpot (or if they are using it for the first time), the HubSpot Intelligence iframe will display a request for them to login.
Step 6: Understand the Functionality and Adjust User Permissions as Necessary
Finally, you will want to familiarize yourself and your Users with the new functionality.
Just as before, Salesforce Users will be able to see the Lead Score as well as a timeline of interactions they have had with any digital marketing programs or activities from HubSpot.
First, Salesforce Users no longer have to go to a different iframe/window to enroll the Contact or Lead into a HubSpot workflow. All they have to do is select from the "Select a workflow" drop-down on the top right of the iframe/window.
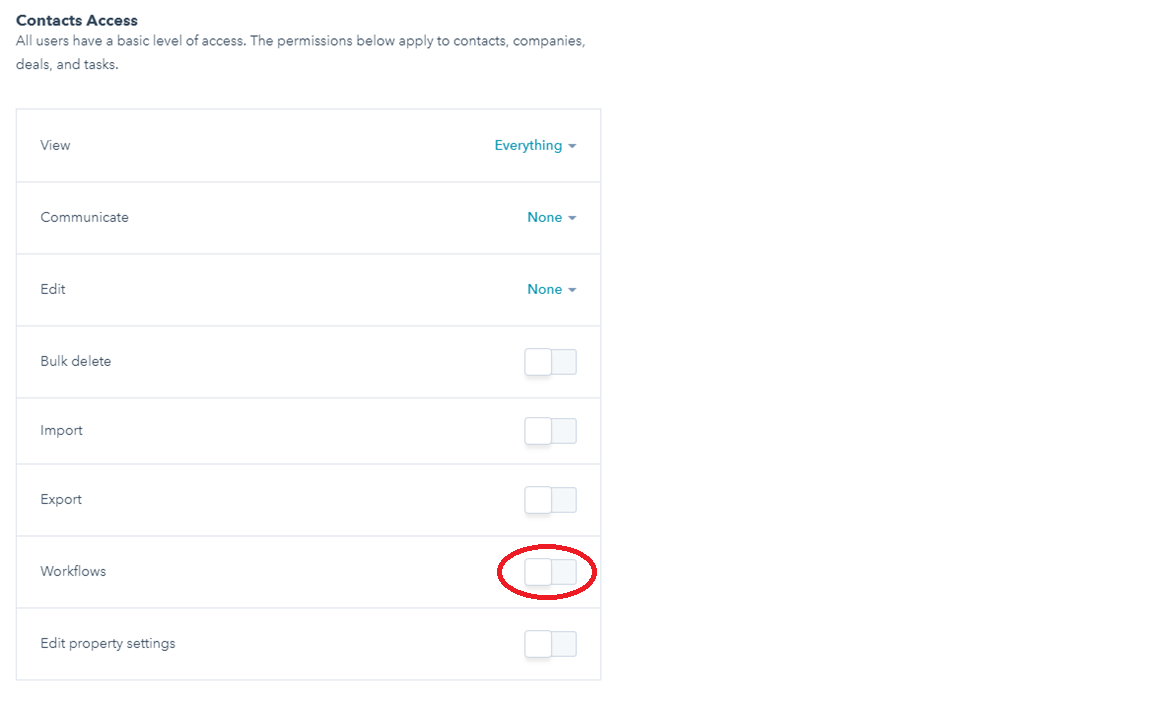
**NOTE: Currently it isn't possible to restrict individual workflows from being displayed here - even when you have your HubSpot workflow setting for "allow to enroll in Salesforce" unchecked. Hopefully, a future release of this new package will restore this functionality.
In the meantime, if you want to restrict Salesforce Users from having this feature, you can disable it completely by going to the HubSpot User page and de-activating their Contact Access > Workflow permissions.
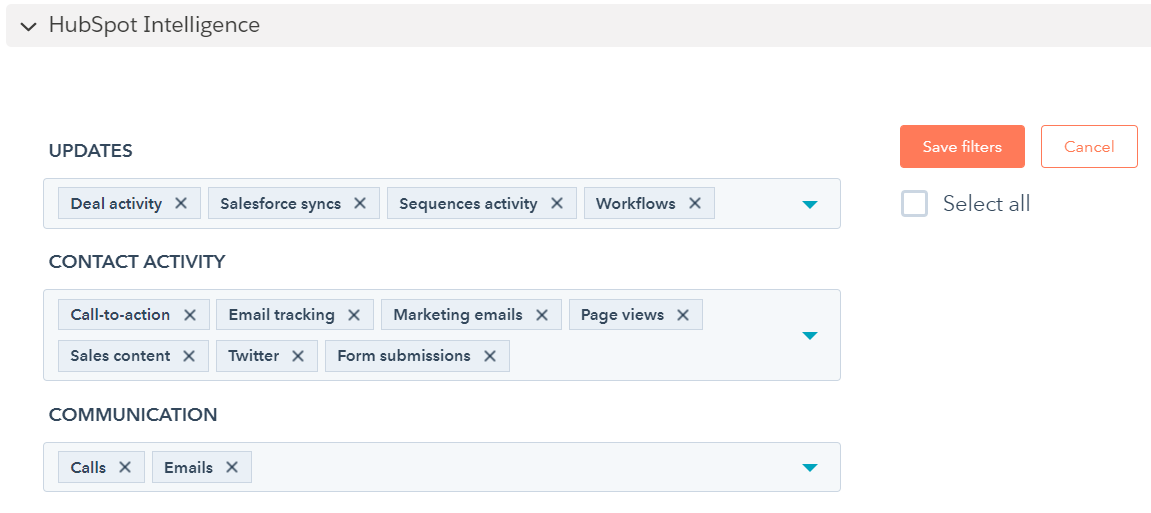
The second new feature is the Timeline "Filter" which, when selected, allows the user to pick the types of activities or interactions that they consider most relevant to them. This could be helpful if the sales person only wants to see Page Views, Form Submissions or Meeting requests.
And that's it! If you have any questions or feedback, just leave a comment or if you want some hands-on assistance, reach out to us - we specialize in HubSpot-Salesforce integrations and enjoy helping Marketing and Sales Work Together!
Recent Posts
HubSpot And Salesforce renew ISV AppExchange Partnership
In a surprisingly quiet blog posting on May 13th 2020, HubSpot announced that they have renewed...
Organic Endeavors Awarded HubSpot Advanced Implementation Certification
We are over-the-moon excited to announce that Organic Endeavors has been selected to become one of...
Inbound for Beginners: Why Inbound Marketing?
Working as an intern with Organic Endeavors, Allen gave me the freedom to work on what most...